If you're looking for a Christmas pudding alternative still with all the festive feels, this Mince Pie Dessert is for you! It has a baked mince pie base (using shop-bought mince pies), and a no-bake, creamy filling with a touch of orange and a scattering of crumbled mince pies running through it. It's a lovely and light dessert, making it perfect to serve after a heavy Christmas Dinner.
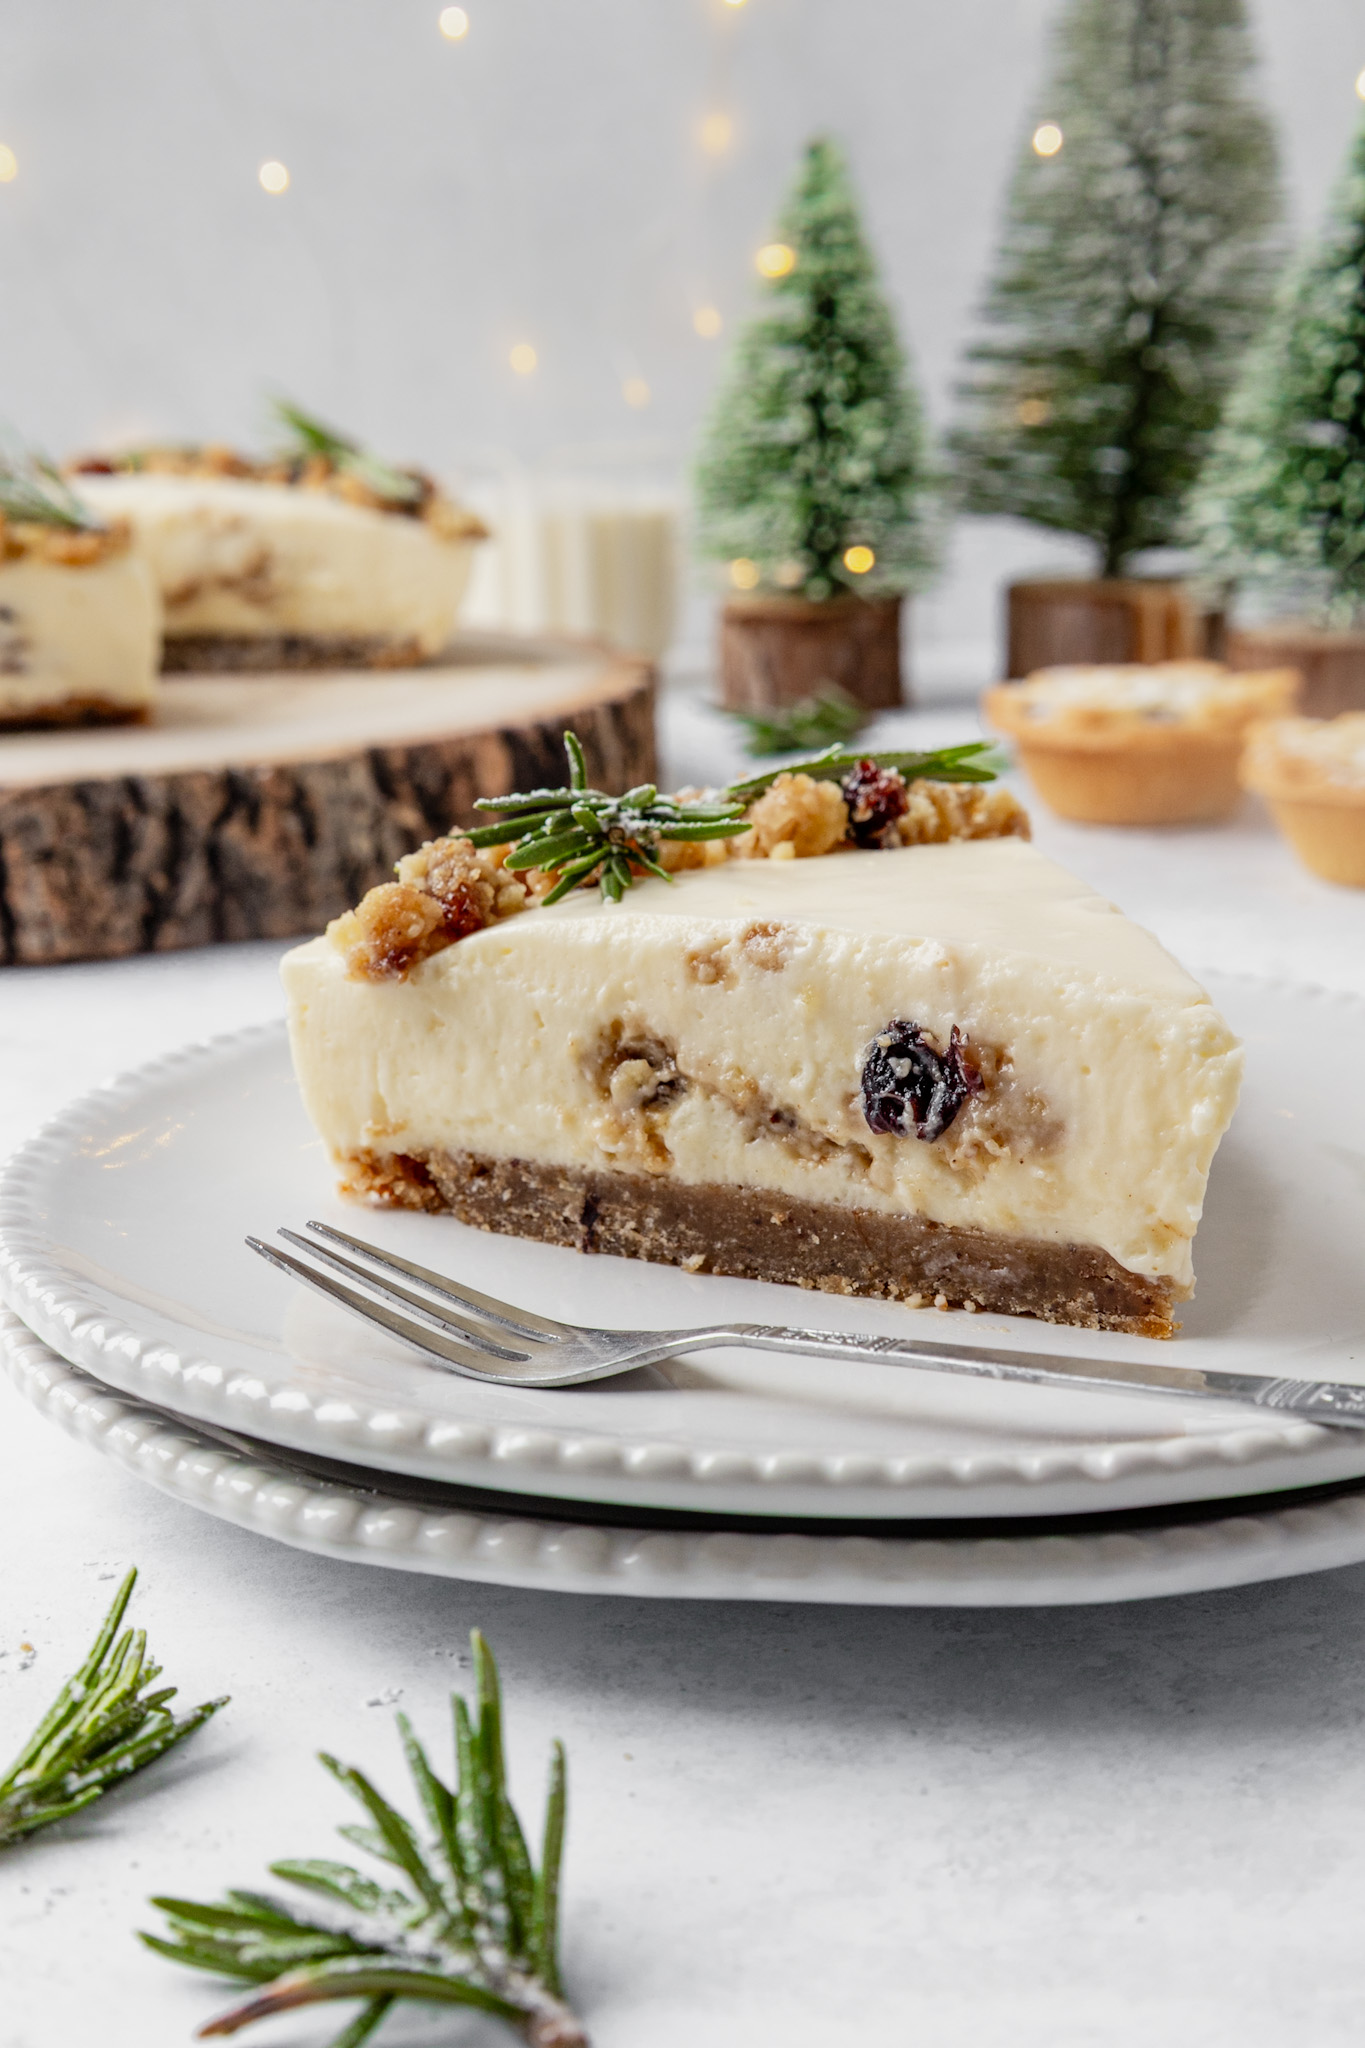
Whilst this may look like a mince pie cheesecake, but there's actually no cheese in sight. Instead, the filling is made with cream, condensed milk and gelatine powder and the consistency is similar to velvety panna cotta.
Using shop bought mince pies, and a whipped filling, you don't need to be a skilled baker to make this Mince Pie Dessert. It's a great size for feeding a crowd, serving 10-12 people. It can be made the day before, and decorated in just a few minutes nearer serving time. Or you can go without decoration if you prefer.
Making my Mince Pie Dessert: Notes
You'll need to make this dessert at least 5 hours before you want to serve it, or ideally the day before. If you are having it for Christmas Day, you'll want to make it the day before on Christmas Eve anyway. You'll first need to make the crumb base of mince pies and melted butter, using a food processor. Then you'll bake it briefly for 10 minutes, leave it to cool for one hour and then transfer to the fridge while you make your filling.
You'll also need to crush some of the mince pies in a food bag with a rolling pin or meat mallet briefly for the filling, and to decorate.
To make the filling, you'll need an electric whisk and two medium-large mixing bowls. You'll also need to juice the orange and strain the pulp out of it using a sieve or tea strainer. Once the filling is done, you'll pour it onto the cooled base, cover and chill to set.
For full instructions, see recipe below.
Mince Pie Dessert Ingredients: Notes
Here are my notes for the main ingredients for this mincemeat pie dessert. Scroll down to the recipe to see the full list and measurements.
Mince Pies
You will need to buy two packs of six mince pies, go for the basic shortcrust pastry, supermarket own label ones. Of the two packs you will need eight mince pies, or seven if you don't want to decorate the dessert. You're also going to need a food processor in order to make the crust with five of the mince pies. You'll then add a little melted butter and whizz again. Next, press the crumb into the bottom of an 8 inch cake tin and bake briefly for 10 minutes. Then you'll leave it to cool for an hour before transferring to the fridge while you make your filling.
You'll put the other three mince pies into a food bag and crush up briefly with a rolling pin or meat mallet. Two thirds of those crushed mince pies will be used to fold through the creamy filling, and the remainder you will crumble on around the edge of the desert.
Condensed Milk
You'll need to buy a tin of regular condensed milk, not light or an unsweetened version. We're using condensed milk in this Mince Pie Dessert because of the silky texture and sweet flavour it gives it. Plus, because of its thickness, it will help it to set to the perfect consistency. And because it is so sweet (along with the mince pies), we will only be adding a very small amount of sugar.
Orange
You'll need one orange for the filling, just to give it a subtle orange flavour that pairs perfectly with the mince pie and cream flavour. You will need to juice the orange, then strain away the pulp. You will then stir the juice into the condensed milk.
Gelatine
To set this creamy filling, giving it a panna cotta type consistency, you will need gelatine. You'll want to buy gelatine powder in sachets, or in a large pack. You'll need 3 teaspoons of it, which is just under one 12 g sachet. If you've not used gelatine before, don't be put off, it's really nothing to be scared of. You'll just add it to some water, let it stand for a couple of minutes, then microwave it briefly and stir to dissolve. Once it's cooled off a little, add it to your creamy filling and you can let the fridge do the work of setting it.
Whipping Cream
Of course, you can't have a creamy dessert filling like this without whipping. You'll need a 300ml pot or 10.14oz heavy cream(US). This will be whisked with an electric whisk, also while you add in the sugar, followed by the cooled gelatine. Next, you'll add in the condensed milk and orange juice mixture.
Decorating & Serving my Mince Pie Dessert: Notes
How to Serve
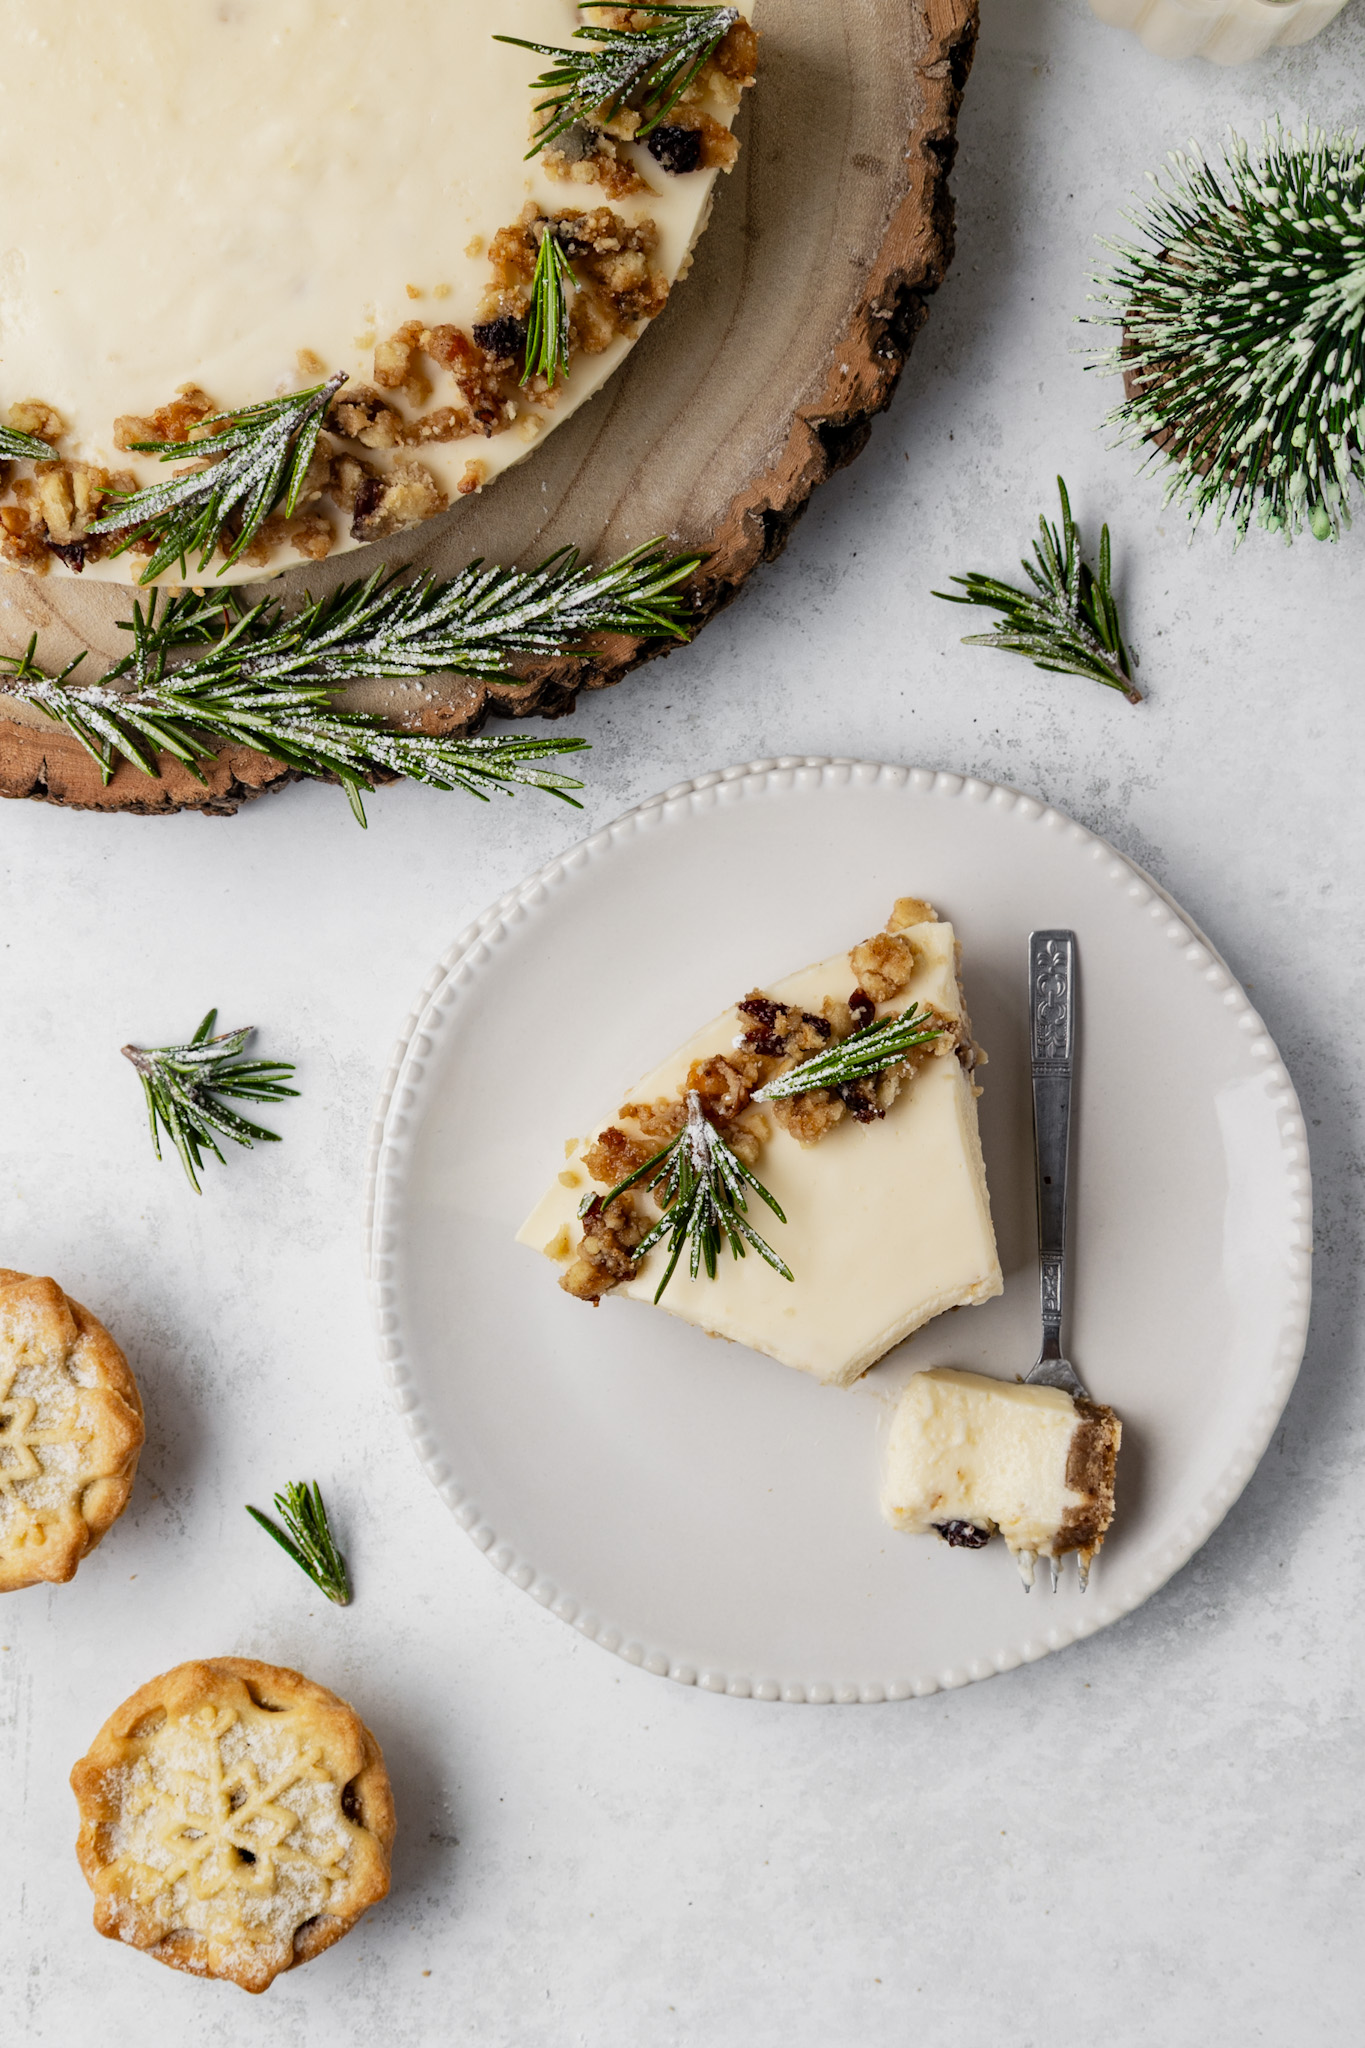
Because you can't cover the dessert without it being in the tin, covering the top of the dessert with clingfilm/plastic wrap will result in the filling sticking to the clingfilm. I recommend you leave it in the tin until you are nearly ready to serve. Then to remove the Mince Pie Dessert from the baking tin, run a sharp knife round the edge of the filling before releasing the cake tin side. Then release it slowly.
You can either leave the dessert on the cake tin base to serve, or use a knife and a cake lifter to lift the dessert onto a cake stand or plate for table serving. To do this, carefully slide in the knife in between the dessert base and the baking tin liner. Use the knife to then help you slide in the cake lifter a little, then slide the knife out and carefully slide the cake lifter all the way under the base, lift and then place onto a plate or cake stand.
Refrigerate, uncovered and keep in the fridge until ready to serve. Because it won't be covered, I would only recommend doing this for 2 to 3 hours before serving.

How to Decorate
This is optional, you can serve this Mince Pie Dessert as it comes out the tin. If you do want to decorate it, I recommend removing it from the tin up to a couple of hours before you want to serve it. For example, after you've had Christmas dinner. Then decorate it, and transfer back to the fridge on just the base or cake stand until ready to serve.
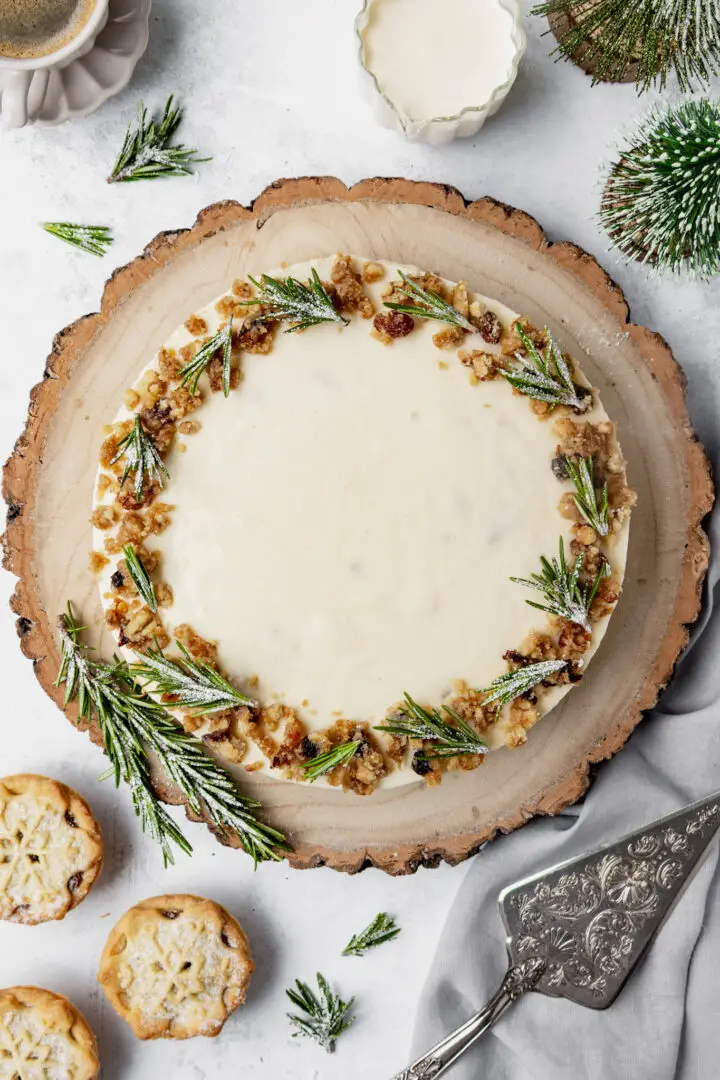
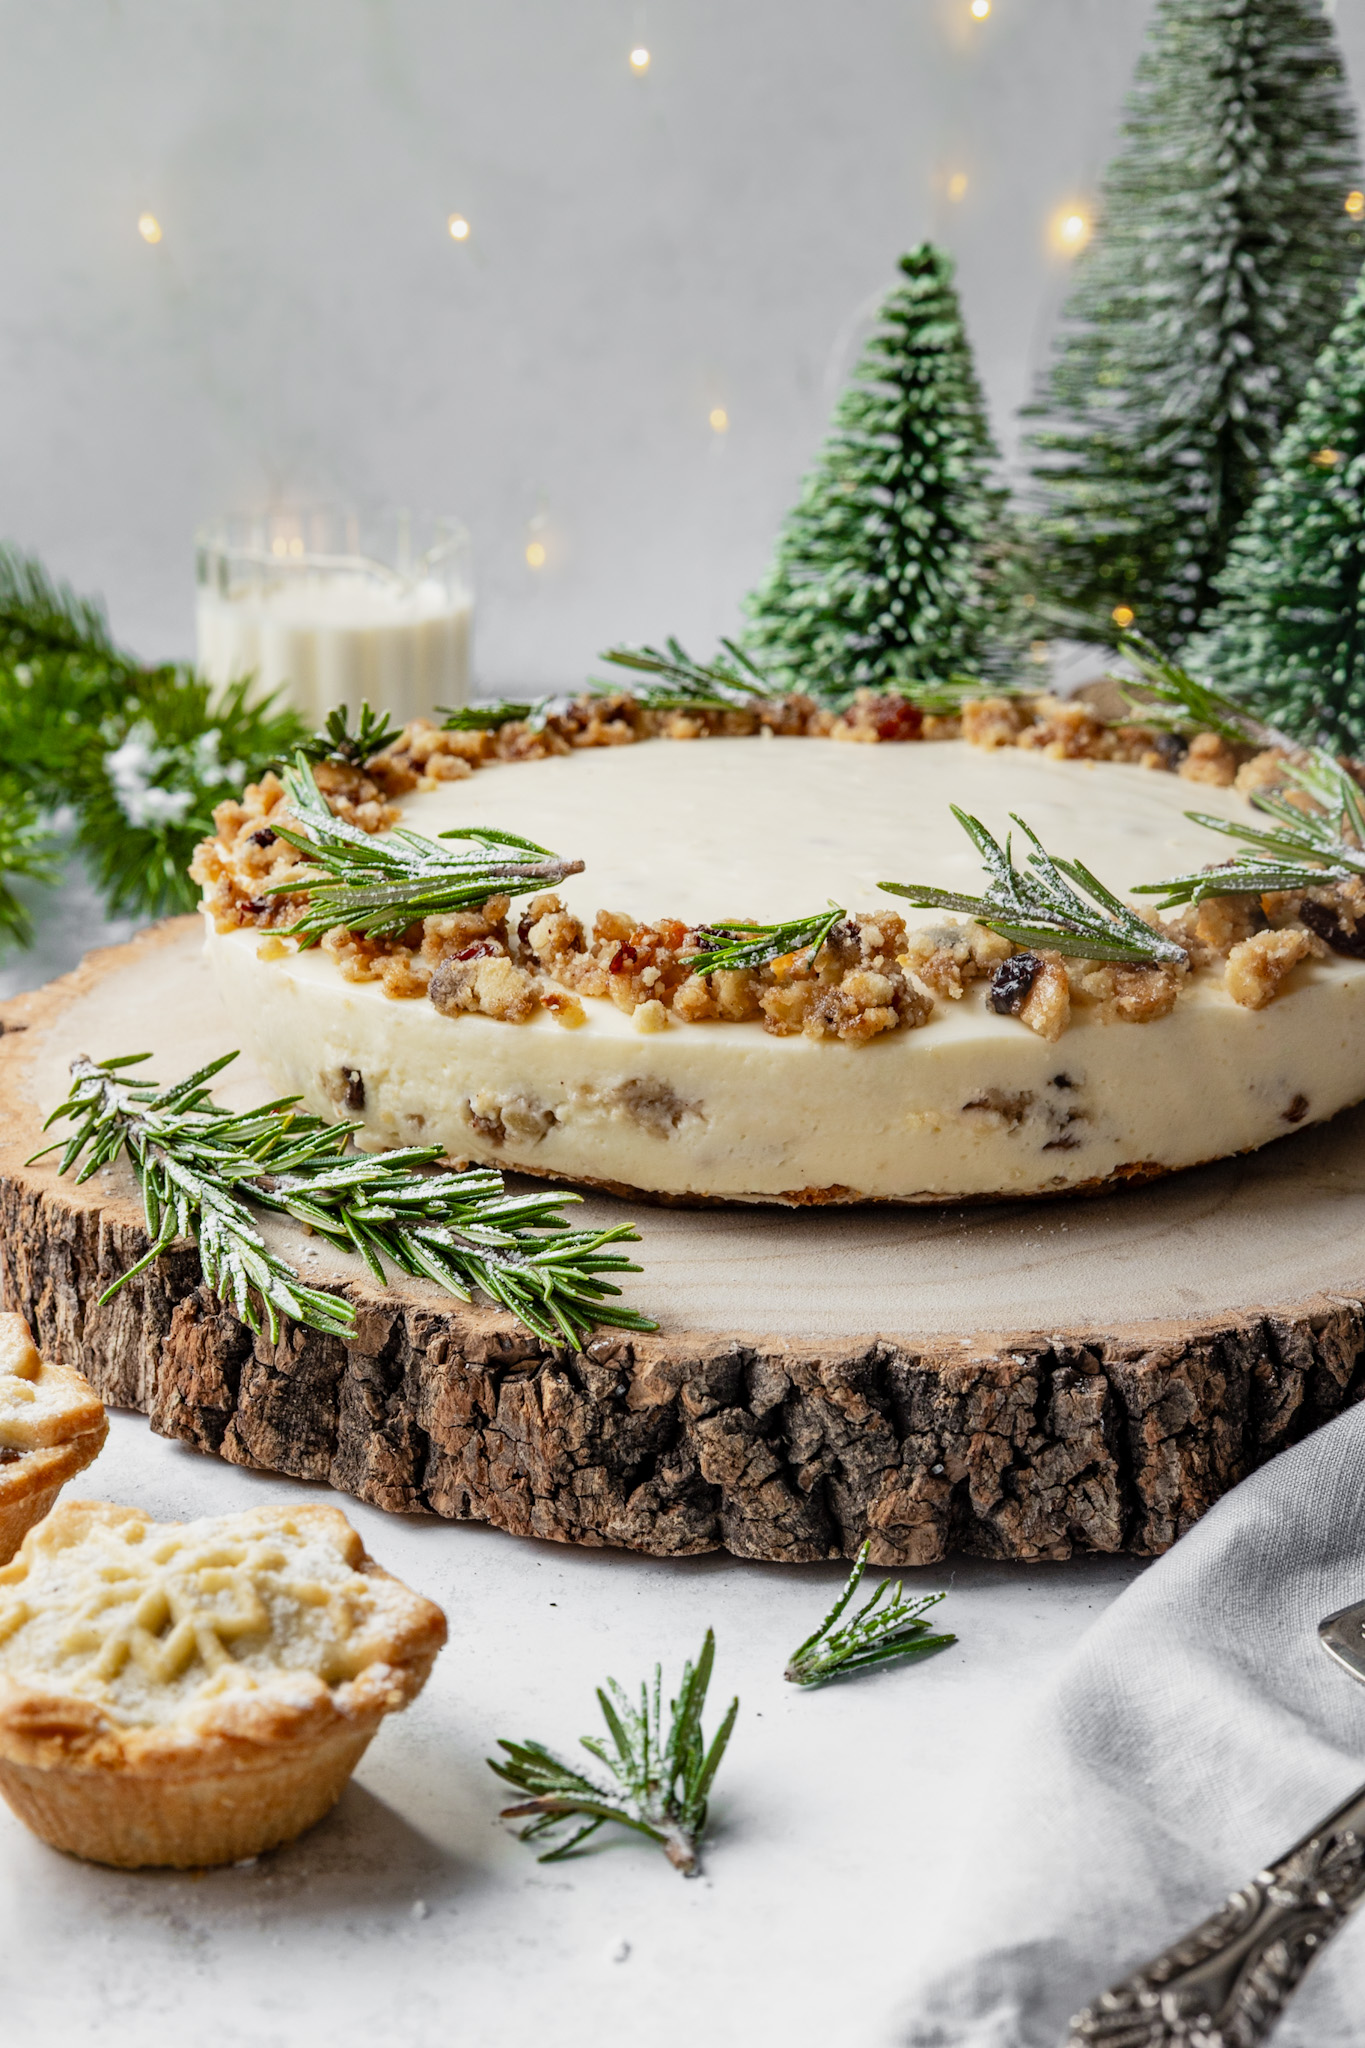
To decorate, use your fingers to further crumble the remaining crushed mince pie around the edge of the cheesecake, sprinkling it around ½ inch wide all the way round. To finish the decoration, you'll also need a pack of rosemary and a little icing sugar.
Then, using food scissors, snip some of the sprigs into two size pieces 1) the very tip of the sprigs under the first leaves, and 2) pieces that are a little longer, under 2 tiers of leaves. You will need about 6 of each. Then take a small sieve or tea strainer and dust them with icing sugar. Place the larger rosemary sprigs on top of the crumb edge, evenly spaced. Then add the smaller sprigs in between. See video near top of page and pictures for guidance.
FAQ's For My Mince Pie Dessert
How far in advance can I prepare this Mince Pie Dessert?
This dessert needs at least five hours in the fridge in order to set the filling. I would definitely recommend making it the day before. Otherwise, if you're serving it after dinner, you could make it first thing in the morning. But if you are serving it on Christmas Day, you obviously won't be wanting to make it Christmas morning anyway.
Decorating is optional, but if you do want to, you'll want to remove it from the cake tin (see above) and decorate it right before, or up to a couple hours before you serve it. If you do this a couple of hours in advance to serving, just transfer the Mince Pie Dessert back into the fridge until you're ready to serve.
Can I use gelatine sheets instead of powder?
I wouldn't recommend it as I haven't tested it with gelatine sheets, so I wouldn't know how many to recommend you use.
The gelatine has started to set, can I use it still?
Unfortunately not. If you leave the gelatine to cool for too long, it will set and when you add it to the cream filling mixture, it will not incorporate properly and will remain as clumps in the filling. It may also mean you're filling doesn't set. Best thing to do is restart the gelatine process again and carry on with the recipe steps where you left off.
Can I Store Mince Pie Dessert leftovers?
You can store any Mince Pie Dessert leftovers in an air-tight container in the fridge for up to 3 days (make day + 2).
More on safe food storage and reheating.
What diets is this recipe suitable for?
My Mince Pie Dessert is suitable for egg-free diets (so long as your mince pie packet doesn't contain an egg warning) and vegetarians.
You Might Like…

Together to Eat is reader-supported. I may earn a small commission from anything bought through links found here.

Mince Pie Dessert
Special Equipment
- 8 inch baking tin
Ingredients
FOR THE CRUST
- 5 shortcrust mince pies
- 40 g unsalted butter
FOR THE FILLING
- 397 g can condensed milk
- 100 ml cold water
- 3 tsps gelatine powder, unflavoured (most of 1 sachet)
- 1 orange, juiced & sieved
- 300 ml whipping cream
- 2 tablespoon caster sugar
- 2 mince pies
TO DECORATE (optional)
- 1 mince pie
- 1 pack rosemary
- A little icing sugar
Instructions
THE CRUST
- Preheat the oven to 180º/160ºc fan/350ºf/gas 4 and grease an 20cm/8inch round springform baking tin and line the bottom.
- Add 5 mince pies to your food processor and whizz on high until you have a dough like consistency.
- Melt the butter in the microwave for around 30 secs and stir until fully melted. Add to the food processor and blend again to combine. Add the mince pie mixture to the baking tin, levelling it out to cover the bottom as evenly as possible with a spatula. Keep the crumb below the tin base rim, you can run the tip of the spatula round it. Use a fork to pierce the base several times.
- Transfer to the oven and bake for 12 minutes, or until the edges are going golden brown and the middle no longer looks wet. Set aside until cooled down, at least an hour. Then transfer to the fridge to chill further while you start making your filling.
THE FILLING
- Add the condensed milk and the orange juice to a medium-large mixing bowl and stir briskly with a balloon hand-whisk until well combined.
- Add the water to a bowl and add in the gelatine. Leave for 2 minutes. Then microwave for 20 seconds. Remove and stir briskly until all the gelatine has dissolved. Leave it to cool slightly, for about 10 minutes, being careful not to let it get too cool and set.
- In the meantime, put the 3 remaining mince pies (2 for filling + 1 for decoration) into a food bag and crush briefly with a food mallet or rolling pin.
- Then in another medium-large mixing bowl, whisk the cream on medium speed for about 1 minute. Then add in the sugar while whisking, one tablespoon at a time. Add in the cooled gelatine, still while whisking, then turn to high and continue to whisk until the mixture thickens and the beginning of stiff peaks form.
- Add in the condensed milk mixture, and whisk on low until just combined.
- Then using your fingers, crumble in about ⅔'s of the crushed mince pies, making sure to not add in big clumps. Fold in briefly with a large metal spoon.
- Carefully pour the filling onto the mince pie base in the baking tin, then give it a gentle shake to level out. Cover the tin with clingfilm and transfer to the fridge for at least 5 hours, ideally overnight.
REMOVING THE TIN
- Because you can't cover the dessert without it being in the tin (covering it with clingfilm directly will run the look of the top), I recommend you leave it in the tin until nearing time to serve it. Then to remove it from the tin, run a sharp knife round the edge before releasing the cake tin side, slowly. You can leave the dessert on the tin base to serve, or use a long knife and a cake lifter to lift the dessert onto a cake stand or plate. Carefully slide in the knife in between the dessert base and the cake tin liner. Use the knife to then help you slide in the cake lifter a little, then slide the knife out and carefully slide the cake lifter all the way under the base and lift it off.
TO DECORATE (optional)
- Use your fingers to further crumble the remaining crushed mince pie around the edge of the dessert. Then, using food scissors, snip some of the rosemary sprigs into two size pieces 1) the very tip of the sprigs under the first leaves, and 2) pieces that are a little longer, under 2 tiers of leaves. You will need about 6 of each. Then take a small sieve or tea strainer and dust them with icing sugar. Place the larger rosemary sprigs on top of the crumb edge, evenly spaced. Then add the smaller sprigs in between. See video & pictures for guidance.
Notes
STORAGE


Comments
No Comments